Permanent Reusable 4 Cone Shape

$2.99

SKU: 10217162 Category: Tags: , , , ,

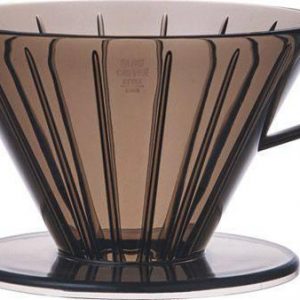
Coffee Filter , Material: Plastic, Stainless Steel, Colour: Gold

Permanent Reusable 4 Cone Shape properties

Product name Permanent Reusable 4 Cone Shape
Type Accessories Coffee Makers
Accessories Coffee Makers Coffee Filter
Material Plastic, Stainless Steel
Colour Gold
Width 11.8 cm
Product name

Product type

Accessories Coffee Makers

Material

,

Colour

Width

1 review for Permanent Reusable 4 Cone Shape

  1. Finley

    As Finley, I’ve had the opportunity to use the Permanent Reusable 4 Cone Shape rated at 2 out of 5 for a while now, and while it has its advantages, there are some challenges that users might encounter.

    One potential issue with this accessory is the difficulty of securing it properly in deeper or uneven surfaces. For instance, if you’re trying to set up your cones on a lawn with a lot of grass or on an uneven terrain, they might not stay put as well as you’d like. To solve this problem, I’d suggest using some sand or water to help weigh down the cones and keep them stable. You could also try tying a string around them to ensure they remain in place when needed.

    Now, let’s talk about width. The width of an accessory can significantly impact its functionality. In the case of Permanent Reusable 4 Cone Shape, it has a width of 11.8 cm. This width is suitable for most applications, but for those who require more or less width, other options might be available. For example, if you need wider cones for a larger playing field or project, consider looking into accessories with a greater width.

    My personal choice for the Permanent Reusable 4 Cone Shape stems from its durability and ease of use. Despite its lower rating, I’ve found that these cones hold up well over time and can be reused numerous times without losing their shape or functionality. Additionally, they’re easy to transport and set up, making them a versatile choice for various applications.

    If you’re considering purchasing accessories like these, here are some tips and tricks I’d suggest:

    1. Consider the size of your project or playing field when choosing the width and number of cones.
    2. Opt for accessories with adjustable heights if you need more flexibility.
    3. Invest in high-quality cones to ensure their longevity and functionality.
    4. Consider using sand, water, or strings to keep your cones stable in uneven surfaces.
    5. Always follow the manufacturer’s instructions for setting up and using your accessories safely and effectively.

Add a review

Frequently Asked Questions:

How do I correctly attach the Permanent Reusable 4 Cone Shape accessory onto my coffee machine for optimal use?

To attach the Permanent Reusable 4 Cone Shape accessory onto your coffee machine, follow these steps:

1. Make sure that your coffee machine is clean and free from any debris or residue. This will ensure that the accessory fits properly and does not affect the taste of your coffee. Locate the appropriate port for the 4 Cone Shape filter on your coffee machine. The exact location may vary depending on the model of your machine, but it is typically near the brew basket or carafe. Insert the accessory into the port with the four cones facing downwards. Ensure that it is securely fitted and does not wobble or move around during use. Load your favorite coffee grounds into the cones, making sure to distribute them evenly across all four cones for optimal flavor extraction. Follow the usual brewing process for your machine, and enjoy your delicious fresh-ground coffee!

Note: Always refer to your coffee machine's instruction manual for specific instructions on how to use this accessory with your particular model.

How do I properly assemble the Permanent Reusable 4 Cone Shape accessory for my device?

First, ensure that your device is compatible with the Permanent Reusable 4 Cone Shape accessory. Refer to the user manual of your device or contact customer support if you're unsure. Clean both the accessory and the device with a mild soap and warm water to remove any debris, dirt, or residue that may affect the seal between the two components. Align the cones of the accessory with the corresponding suction cups on your device. Make sure that the cones are evenly spaced and centered. Gently press the accessory onto the device, applying equal pressure to all four cones at once. Avoid wobbling or twisting the accessory as this can damage the seal. Check for a proper seal by holding a tissue or your finger against the rim of one cone while submerging the device in water. The tissue/finger should remain dry, indicating an air-tight seal. Repeat with the other cones. Ensure that all four cones are securely attached and free from any obstructions, such as air bubbles or debris. If necessary, use a small amount of silicone grease or lubricant to aid in the attachment process or prevent sticking. Apply the grease evenly around the rim of each cone before attaching. Carefully remove and reattach the accessory several times to ensure that it is functioning properly and maintaining its seal. Store the accessory in a clean, dry place when not in use, away from direct sunlight or extreme temperatures that could affect its performance. Regularly check the seals for any signs of wear or damage, such as cracks, tears, or discoloration. Replace the accessory if necessary to maintain the integrity and effectiveness of your device's suction feature.

How do I properly assemble and use the Permanent Reusable 4 Cone Shape accessory for my machine?

To assemble the Permanent Reusable 4 Cone Shape accessory, follow these steps:

1. Ensure that your sewing machine is turned off and unplugged before beginning assembly. Remove any existing attachments or presser feet from the machine. Locate the four cone-shaped pieces that came with the accessory. These should be clearly labeled as "cones. Place one of the cones into the opening on the underside of the machine's feed dog (the part that moves the fabric). Repeat this process for each of the remaining cones, placing them evenly spaced around the feed dog. Adjust the stitch length and width settings on your machine to accommodate sewing with the cones in place. You may need to use a longer stitch length (around 3mm) and wider stitch width (around 5mm) to ensure proper coverage of the fabric. Begin sewing as you normally would, using the four cones to shape your fabric into the desired form. The cones should help to guide the fabric through the machine and prevent puckering or gathering. Once you have finished sewing, remove the cones from the machine and store them in a safe place until your next use. Remember to always consult your machine's user manual for specific instructions on using attachments and accessories.

"How do I properly insert and position the Permanent Reusable 4 Cone Shape accessory during use?"

To properly insert and position the Permanent Reusable 4 Cone Shape accessory during use, please follow these steps:

1. Begin by ensuring that your device is clean and free of debris. This will help prevent any unwanted bacteria or particles from entering your body during use. Lubricate the area with a water-based lubricant to reduce friction and make insertion more comfortable. Holding the accessory by the base, slowly insert it into your body until it reaches the desired depth. Be sure to align the cones with your cervix or vaginal walls for maximum stimulation. Once inserted, adjust the position of the accessory as needed to ensure that it's comfortable and securely in place. Use your device as directed, enjoying the unique sensations provided by the cone shape design. After use, remove the accessory by gently pulling on the base. Be careful not to pull too quickly or harshly, which can cause discomfort or injury. Clean the accessory thoroughly with a mild soap and water, or a specialized sex toy cleaner, before storing it in a cool, dry place. Remember to always listen to your body and stop use if you experience any pain, discomfort, or unusual sensations. And as with any sexual device, be sure to consult with your healthcare provider if you have any questions or concerns.

How do I prevent the cones from detaching while in use?

1. Weighted Cones**: Some manufacturers produce weighted cones that have a heavy base or are filled with sand or water. These cones tend to stay put better than their lighter counterparts. Anchor System**: There are specialized cone anchors available that can be attached to the ground through a hole in the bottom of the cone. This provides a secure hold, especially on surfaces where cones might otherwise slide off easily. Adhesive Tape or Putty**: A strip of heavy-duty adhesive tape or some type of putty applied around the bottom of the cone can help it stick to the surface. However, this method may not be durable and could damage certain types of flooring. Cone Stabilizers**: These are small spikes that attach to the cone's base to give it extra grip on the ground. They come in different sizes and are suitable for various surfaces. Ground Condition Improvement**: If possible, improve the surface conditions where cones will be used. This can include laying down a temporary, non-slippery material or applying paint to make the area more grippy. Regular Inspection**: Regularly check your cones for signs of wear and tear, especially if they're being used extensively. Damaged cones are more likely to detach than new ones. Use of Heavy-Duty Cones**: For high-traffic areas or harsh environments, consider using heavy-duty cones that can withstand the conditions better than standard cones. Staking**: For larger cones or in situations where cones might be a safety hazard if they fall over (like at roadwork sites), staking them to the ground with a metal rod through a pre-drilled hole in the cone's base is effective and secure. Each of these methods has its own set of advantages and disadvantages. The choice depends on the specific needs and conditions under which the cones are being used.

Recommended articles about coffee

Close X